Tuesday, August 24, 2021

TechBlog Links

 As a good software engineer, one needs to keep updated on the emerging technologies & the use cases where to apply those technologies. 

To gain more knowledge, one should follow the technology blogs; below are few of my favorite technology blogs:

1. https://blog.allegro.tech/

2. https://doordash.engineering/

3. https://engineering.cerner.com/

4. https://booking.design/

5. https://netflixtechblog.com/

6. https://medium.com/expedia-group-tech

7. https://comcast.github.io/blog.html

8. https://shekhargulati.com/

9. https://www.appsdeveloperblog.com/keycloak-rest-api-create-a-new-user/


Saturday, August 14, 2021

Routing Http Calls through Proxy

Proxy server is one of the network backbone for any corporate network. There are 2 types of proxy setup

1. Forward Proxy: Used for the outbound traffic going from your network to Internet. It is also called Client Side Proxy.

2. Reverse Proxy: Used for inbound calls where traffic is coming from Internet to your network.

Below picture depicts the 2 proxies


In this article, we will discuss on Forward Proxy setup & dicuss how to route the calls through Forward Proxy from Java Http client calling codes.

Step 1: Forward Proxy Setup in Windows 

There are many open source Forward Proxy available like Apache Httpd , Squid etc.

I have chosen Squid for Proxy setup as it has a very easy setup.

First download Squid from https://squid.diladele.com/ & install the msi

This will be installed as a Windows service.

Step 2: Post Installation configuration of Squid

Once installed you will find Squid tray

Click "Open Squid Configuration" option

Add the below one at last of the configuration file, this will speed up the traffic calls.

dns_v4_first on

Step 3: Client calls from Java routing through Proxy

Suppose you want to call https://www.google.com/ from Java Client.

In this example, we will use Spring RestTemplate.

Create a new Maven project.

3.1. Add the below dependencies

<dependency>

<groupId>org.apache.httpcomponents</groupId>

<artifactId>httpcore</artifactId>

<version>4.4.13</version>

</dependency>

<!-- https://mvnrepository.com/artifact/org.springframework/spring-web -->

<dependency>

    <groupId>org.springframework</groupId>

    <artifactId>spring-web</artifactId>

    <version>4.3.30.RELEASE</version>

</dependency>


3.2. Sample Code for Proxy call:

import java.net.InetSocketAddress;

import java.net.Proxy;

import java.net.Proxy.Type;

import org.springframework.http.ResponseEntity;

import org.springframework.http.client.SimpleClientHttpRequestFactory;

import org.springframework.web.client.RestTemplate;

public class ProxyHttpClient {

private static String PROXY_SERVER_HOST = "localhost";

private static int PROXY_SERVER_PORT = 3128;

public static void main(String[] args) {

Proxy proxy = new Proxy(Type.HTTP, new InetSocketAddress(PROXY_SERVER_HOST, PROXY_SERVER_PORT));

SimpleClientHttpRequestFactory requestFactory = new SimpleClientHttpRequestFactory();

requestFactory.setProxy(proxy);

RestTemplate restTemplate = new RestTemplate(requestFactory);

ResponseEntity<String> responseEntity = restTemplate.getForEntity("https://www.google.com/", String.class);

String bodyStr = responseEntity.getBody();

System.out.println("bodyStr:" + bodyStr);

}

}

Links:

Squid Setup

Proxy Concept

Wednesday, June 9, 2021

Event Handling in Spring

Suppose you are working on a Order Management system. Once the order is placed, the  system needs to do the following taks:

1. Send email notification to customer

2. Send request to Payment processing system to make payment.

Generally, in traditional way of programming, once the order is placed we call below 2 methods:

sendEmailToCustomer()

makePayment()

Now suppose , the product owner gives you a requirement to send email notification to seller also once the order is placed. To do that, now you need to introduce another method, sendEmailToSeller, along with the above 2 methods.

This approach has a drawback. If the order is created from multiple places, we need to introduce this change in all these places.

We can handle the same problem in event driven approch. We can consider Order creation as an event; hence it becomes a producer for event & sending email to cutomer , making payment & sending email to Seller become the event consumers.

Spring framework comes with an in-built support for Event Driven processing. It requires 3 elemts for an event:

1. the Event itself

2. Pulisher of the event

3. Consumer/Listener of the event

All of these are handled in Spring framework in an elegant way. 

Prerequisite: 

Java 8

Spring framework version: 4.3.30.RELEASE

Maven dependency:

                <dependency>

<groupId>org.springframework</groupId>

<artifactId>spring-core</artifactId>

<version>4.3.30.RELEASE</version>

</dependency>

<dependency>

<groupId>org.springframework</groupId>

<artifactId>spring-context</artifactId>

<version>4.3.30.RELEASE</version>

</dependency>

Event: The event can be any Java Bean model class; for brevity have removed the getters & setters. You can add @Getter & @Setter annotation from lombok library also.

public class OrderEvent {

private String itemName;

private int quantity;

}

Event Publisher: Spring comes with an in built ApplicationEventPublisher class defined in org.springframework.context.ApplicationEventPublisher.

You can publish the event like below: 

@Service

public class OrderEventProducer {

@Autowired

private ApplicationEventPublisher publisher;

public void publishTestEvent() {

OrderEvent order = new OrderEvent();

order.setItemName("Pen");

order.setQuantity(5);

System.out.println("Puslishing order");

publisher.publishEvent(order);

}

}

Event Listener: Once the event is pusblished, it can be consumed. The consumers are called EventListner. Spring comes with below features for Event listener/consumers
1. The consumer can be asynchronous , add @EnableAsync annotation at class level & the method to be processed async. way need to add @Async annotation.
2. For multiple consumers orders can be set with @Order annotation
3. Any method can be marked as event listener with  @EventListener annotation
4. The event listener method must have the same event argument in consumer method as published from ApplicationEventPublisher.

The code snippet will look like below.

@Component
@EnableAsync
public class OrderEventListener {
@Async
@EventListener
@Order(1)
public void sendEmailToCustomer(OrderEvent event) {
System.out.println("Starting email sending");
delay();
System.out.println("sendEmail:" + event);
}

@EventListener
@Order(2)
public void makePayment(OrderEvent event) {
System.out.println("makePayment:" + event);
}

private void delay() {

try {
TimeUnit.SECONDS.sleep(10);
} catch (InterruptedException e) {
e.printStackTrace();
}
}
}

Now, you can easily add other consumer methods for same event with OrderEvent  as parameter. No code change required at producer end.

Code Example:


Furthur Reading:


Tuesday, June 8, 2021

Caching using Hazelcast

Caching is one of the important aspect when we do system design as it enhance the performance.

In many of my applications I have used Ehcache as a cache provider with Spring applications. One of the problem with Ehcache is ; the cache resides in Single Node. 

Let's consider the below scenario:

Suppoe, we have an application where we have a method which provides Book details based on isbn provided in input. The method to findBookByIsbn is costly & cache is implemented.

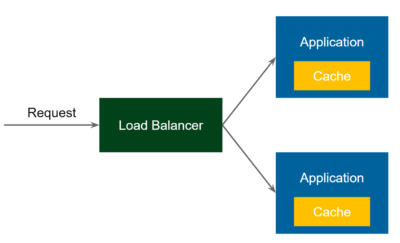
Now, we call findBookByIsbn for isbn 1 & through Load Balancer, it goes to Node 1 & it fetches the data from DataBase & store in cache.

Now, another call is made to findBookByIsbn for isbn 1 & through Load Balancer, it now goes to Node 2. In this case it again fetches the data from DataBase & store in cache.

Hence, for same data (isbn=1) the db call is again made in DataBase as the cache resides in each node seperately. 

The architecture is deplicted in below image


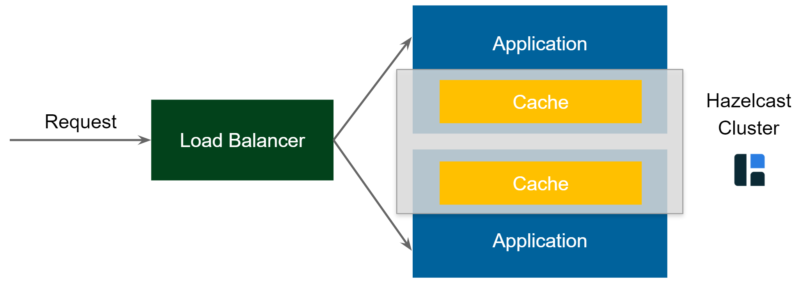
Now, you can solve this problem by creating an Embedded Distributed Cache (aka Replicated Cache). In this case, Cache of Node 1 interacts with Node 2 & replicates the data. The architecture will look like below:


This technique can be implemented using Ehcache with JGroups.


EHCache Replicated Cache Tutorial Links:


As in Ehcache-Jgroups combination, we need to do lot of manual configuration, another good alternative is using Hazelcast. In this note, I am going to give you the steps you required to use HazelCast as cache manager

Pre-requisite:

Requied Java Version: 8

Spring Framework Verion used: 4.3.30.RELEASE

The Cache data type should implement Serializable interface

Step #1: Adding Maven dependency for Hazelcast Spring integration & Spring Context upport

                <dependency>

<groupId>com.hazelcast</groupId>

<artifactId>hazelcast-spring</artifactId>

<version>4.2</version>

</dependency>

        <dependency>

<groupId>org.springframework</groupId>

<artifactId>spring-context-support</artifactId>

<version>4.3.30.RELEASE</version>

</dependency>

 Step #2: Defing the method. The method must be defined in a Spring Bean class (Class having annotation Service/Component or defined in XML)

@Cacheable("bookIsbnCache")

public Book findBookByIsbn(String isbn) {

        // DB / Service call goes here 

        }

Step #3: Define the cache in application context xml

<beans xmlns="http://www.springframework.org/schema/beans"

xmlns:context="http://www.springframework.org/schema/context"

xmlns:p="http://www.springframework.org/schema/p"

xmlns:cache="http://www.springframework.org/schema/cache"

xmlns:hz="http://www.hazelcast.com/schema/spring"

xmlns:mvc="http://www.springframework.org/schema/mvc"

xmlns:xsi="http://www.w3.org/2001/XMLSchema-instance"

xsi:schemaLocation="

        http://www.springframework.org/schema/beans     

        http://www.springframework.org/schema/beans/spring-beans.xsd

        http://www.springframework.org/schema/context 

        http://www.springframework.org/schema/context/spring-context.xsd

        http://www.springframework.org/schema/mvc

        http://www.springframework.org/schema/mvc/spring-mvc.xsd

       http://www.springframework.org/schema/cache http://www.springframework.org/schema/cache/spring-cache.xsd

       http://www.hazelcast.com/schema/spring

       http://www.hazelcast.com/schema/spring/hazelcast-spring.xsd">

<!-- Other bean definition-->

<cache:annotation-driven
cache-manager="cacheManager" />

<hz:hazelcast id="instance">
<hz:config>

<hz:cluster-name>TestHzCluster</hz:cluster-name>

<!--  used for clustering.
<hz:network port="5701" port-auto-increment="false">
<hz:join>
<hz:multicast enabled="false" />
<hz:tcp-ip enabled="true">
<hz:members>x.x.x.x, y.y.y.y</hz:members>
</hz:tcp-ip>
</hz:join>
</hz:network>
-->

<hz:map name="bookIsbnCache" time-to-live-seconds="60"
in-memory-format="BINARY">
<hz:eviction eviction-policy="LRU"
max-size-policy="PER_NODE" size="100" />
</hz:map>
</hz:config>
</hz:hazelcast>

<bean id="cacheManager"
class="com.hazelcast.spring.cache.HazelcastCacheManager">
<constructor-arg ref="instance" />
</bean>

</beans>

That' it. You can deploy your code in different ports in localhost & you will be able to see the cache is replicated among differnt nodes.

Below is the link for working demo:

https://github.com/souravdalal/SpringHazelcastCacheDemo

Furthur Reading:

Cache Topologies:


Hazelcast with Spring Boot:


Sunday, May 30, 2021

Migrating Java 6/8 projects to JDK 11

Recently, I have migrated some of my applications from JDK 6 & 8 to JDK 11. As Oracle JDK 11 has a license cost associated with it; I have used Amazon Corretto JDK 11; which is a no-cost, multiplatform, production-ready distribution of OpenJDK.

Below are the steps followed for JDK 11 upgrade

Step 1: Install JDK 11 & Maven 3.6.3 & set the path

You can check the https://mkyong.com/java/how-to-set-java_home-on-windows-10/ for details of Java path settings

You can check the   https://mkyong.com/maven/how-to-install-maven-in-windows/ for detail of Maven path settings

Step 2: Next ,you need to do couple of changes in your application pom.xml:

If you have Maven compiler version set for JDK 6 or 8 in any of the below format; then remove those 

Format 1:

<properties>

    <maven.compiler.target>1.8</maven.compiler.target>

    <maven.compiler.source>1.8</maven.compiler.source>

</properties>


Format 2:

<plugins>

    <plugin>    

        <artifactId>maven-compiler-plugin</artifactId>

        <configuration>

            <source>1.8</source>

            <target>1.8</target>

        </configuration>

    </plugin>

</plugins>


We need to add the below compilation setting under <build> tag & surefire plugin settings should be modified as below:

  <plugins>

<plugin>

<groupId>org.apache.maven.plugins</groupId>

<artifactId>maven-surefire-plugin</artifactId>

<version>2.22.0</version>

<configuration>

<argLine>

--illegal-access=permit

</argLine>

</configuration>

</plugin>

<plugin>

<groupId>org.apache.maven.plugins</groupId>

<artifactId>maven-compiler-plugin</artifactId>

<version>3.8.0</version>

<configuration>

<release>11</release>

</configuration>

</plugin>

</plugins>

Step 3: If your application is using Spring Framework 3.x or 4.x then you need to upgrade the Spring version to atleast 5.1.0.RELEASE. 

As 5.1.0.RELEASE is the compatible version with JDK 11. Otherwise, you will not get compile time exception but at runtime you will get exception like below:

Caused by: org.springframework.beans.factory.BeanDefinitionStoreException: Failed to read candidate component class: file [MyClass.class]; nested exception is java.lang.ArrayIndexOutOfBoundsException: 11315

You can find more details in https://www.javagists.com/beandefinitionstoreexception-failed-to-read-candidate-component-class

Upgrading Spring version can give you comile time time error based on methods which has been removed from upper Spring version. E.g. Spring 3.x have methods in JDBCTemplate for queryForInt, queryForLong; which has been deprecated &  queryForObject is introduced from Spring 4.x

Also, if you are using Spring JDK Timer (org.springframework.scheduling.timer); then it needs to be upgraded to  Spring Quartz Scheduler.

Sunday, April 11, 2021

Viewing Tomcat logs on Web Browser

While doing the development, many times developer requires to check the logs of tomcat as well as application logs in Development/QA environments. 
Hence, to check the logs the developer needs to connect to the remote environment to check the log files physically. 

Wouldnot it be nicer if we can view the logs from in browser itself.

Tomcat provides a nice way to handle this. You can view the logs from browser itself. Below are the steps.

Steps:
1. Download Tomcat 9.x & extract the zip.
2. Move to <TOMCAT_INSTALL_DIR>/conf/Catalina/localhost
3. Create a file name logs.xml
4. Add the below line & save the logs.xml file. 
<Context override="true" docBase="${catalina.base}/logs" path="/logs" />
5. Additionally, navigate to web.xml under <TOMCAT_INSTALL_DIR>/conf
6. Change the value of  "listings" parameter to true declared under DefaultServlet as below:

<servlet>
        <servlet-name>default</servlet-name>
        <servlet-class>org.apache.catalina.servlets.DefaultServlet</servlet-class>
        <init-param>
            <param-name>debug</param-name>
            <param-value>0</param-value>
        </init-param>
        <init-param>
            <param-name>listings</param-name>
            <param-value>true</param-value>
        </init-param>
        <load-on-startup>1</load-on-startup>
    </servlet>

7. This enables to view the files under the logs folder.
8. Now Start the tomcat
9. Type in browser  http://localhost:8080/logs/

You will see a output like below , providing the logs under  <TOMCAT_INSTALL_DIR>/logs folder


Some times, the logger logs are generated outside of Tomcat logs folder. 
Suppose, your application logs are generated in under D:/logs/<APP_NAME> folder.

In that case, you can create another file in named <APP_NAME>.xml under <TOMCAT_INSTALL_DIR>/conf/Catalina/localhost

In <APP_NAME>.xml you can put the below content

<Context override="true" docBase="D:/logs/<APP_NAME>" path="/<APP_NAME>" />

Now navigating to http://localhost:8080/<APP_NAME>/ will show you the logs generated under D:/logs/<APP_NAME> folder.


Tuesday, March 2, 2021

Handling Retry with Spring-Retry

 Suppose you have a method for which you want to retry at a specific interval if any exception occurs.

Below are the steps using Spring Retry:

Add below maven dependenciess:

<dependency>

<groupId>org.springframework</groupId>

<artifactId>spring-aop</artifactId>

<version>3.0.5.RELEASE</version>

</dependency>

<dependency>

<groupId>org.aspectj</groupId>

<artifactId>aspectjweaver</artifactId>

<version>1.6.11</version>

</dependency>


<dependency>

<groupId>org.springframework.retry</groupId>

<artifactId>spring-retry</artifactId>

<version>1.1.2.RELEASE</version>

</dependency>

Steps for call:

                SimpleRetryPolicy retryPolicy = new SimpleRetryPolicy();

retryPolicy.setMaxAttempts(5); //Max retry # 


FixedBackOffPolicy backOffPolicy = new FixedBackOffPolicy();

backOffPolicy.setBackOffPeriod(1500); // Retry @ every1.5 seconds


RetryTemplate template = new RetryTemplate();

template.setRetryPolicy(retryPolicy);

template.setBackOffPolicy(backOffPolicy);


return template.execute(new RetryCallback<String, Exception>() {


public String doWithRetry(RetryContext context) throws Exception {

                            // Asumption method m1 is sending String as return type

 String outputStr =m1();

return outputStr;

}

});


RetryCallback should be defined with <[ReturnType Of Method],[Exception to be Retried]>.

Here in case, I have assumed the called method is returning String & retry in case of an instance of Exception is thrown.

Below are the classes need to import:

import org.springframework.retry.RetryCallback;

import org.springframework.retry.RetryContext;

import org.springframework.retry.backoff.FixedBackOffPolicy;

import org.springframework.retry.policy.SimpleRetryPolicy;

import org.springframework.retry.support.RetryTemplate;


Convert Java Project from Log4j 1 to Log4j2

Many times while working on old Java projects we find Log4j 1.x is used. But as the Log4j2 is the new one; hence to upgrade to Log4j2 we nee...