Steps:
- Pre-requisite: Git to be preinstalled in your m/c
- Goto Command prompt & run below command
- git svn clone -r HEAD <SVN Codebase URL>
- This will create a folder with same name of app with .git file
Semgrep is used for SAST tool.
Steps to get the SAST report:
Trivy provides Third party library vulnerability report along with security key exposure in your code.
The tool also provides the version in which the vulnerability is fixed.
You can use the below steps to get a report by checkout the code from your repo:
Go to https://github.com/aquasecurity/trivy/releases/download/v0.48.3/trivy_0.48.3_windows-64bit.zip
Download the zip
Extract the folder
Goto <Extracted Folder>\trivy_0.48.3_windows-64bit
Open command line from above folder
run the below command
trivy fs <codebase path in local m/c>
This will print the vulnerability in command prompt
In case you want to write in file
trivy fs "<codebase path in local m/c>" > <file_name>.txt
Further reading:
Instead of using Docker Hub, GitHub Container Registry can also be used for Image management.
You need to follow the below steps to do that:
1. Login to GHCR from Docker CLI using below command. Replace with your username & personal access token
docker login ghcr.io -u YOUR_GITHUB_USERNAME -p YOUR_PERSONAL_ACCESS_TOKEN
2. Build the Docker image locally
docker build -t ghcr.io/OWNER/IMAGE_NAME:TAG .
3. Push the docker image to GHCR
docker push ghcr.io/OWNER/IMAGE_NAME:TAG
Links for further readings:
https://cto.ai/blog/build-and-deploy-a-docker-image-on-ghcr/
You might have more than one account in Github one is your personal & another is your office account.
To use both of them in Single Windows PC you can do the following:
Pre-requisite: TorotiseGit is installed
Open the terminal in Windows & run the below command
git config --global credential.useHttpPath true
Now, if you try to checkout a repo , then it will ask for Github account user name & password.
For password use Personal Access Token
Personal Access Token can be generated from Profile--> Settings-->Developer Settings-->Personal access tokens (classic)
SonarQube with JDK 17 & Postgres as DB backend
DB:
Install Postgres Server 16.x
Execute the below SQL Script from Postgres DB:
CREATE USER sonar ;
ALTER USER sonar WITH PASSWORD 'sonar';
CREATE DATABASE sonardb WITH ENCODING 'UTF8';
ALTER DATABASE sonardb OWNER TO sonar;
SonarQube:
Add SONAR_JAVA_PATH in Environment variable with value like below <Java_Path>\Java\jdk17.0.8_8\bin\javaw.exe
In sonar.properties
1. Update JDBC url
sonar.jdbc.url=jdbc:postgresql://localhost:5432/sonardb?currentSchema=public
2. Update the below 2 properties too
sonar.jdbc.username=sonar
sonar.jdbc.password=sonar
Once done with above steps;
Navigate to <Sonar Path>\sonarqube-10.2.1.78527\bin\windows-x86-64
From Command prompt type StartSonar.bat to start
Sonar should be accessible:
http://localhost:9000/
For Spring 4.x based web applications we can use the following stuff to add compression on response
Add the below dependency in pom.xml
<dependency>
   <groupId>net.sf.ehcache</groupId>
   <artifactId>ehcache-web</artifactId>
   <version>2.0.4</version>
</dependency>
Then in web.xml add the below filter declarion:
<filter>
   <filter-name>GzipFilter</filter-name>
   <filter-class>net.sf.ehcache.constructs.web.filter.GzipFilter</filter-class>
</filter><filter-mapping>
   <filter-name>GzipFilter</filter-name>
   <url-pattern>/*</url-pattern>
</filter-mapping>
Many a times we need to create POJO from JSON samples. This is a tedious job as we need to create a class & then add the properties.
Is there a better way that Java can automatically generate the class parsing the JSON file.
Yes, Manifold System comes to the rescue. (http://manifold.systems/)
Let's see an example:
1. Java 8
2. Intellij IDE
Steps:
Plugin Install:
Open Intellij IDE
Go to Settings->Plugins -> Marketplace
Find Manifold & install the same.
Dependency Addition in Maven Project
First add the below dependencies in pom.xml
<properties>
  <maven.compiler.source>8</maven.compiler.source>
  <maven.compiler.target>8</maven.compiler.target>
<manifold.version>2022.1.29</manifold.version></properties> Dependency:
<dependency>
  <groupId>systems.manifold</groupId>
  <artifactId>manifold-json-rt</artifactId>
  <version>${manifold.version}</version>
</dependency>
Build Config:
<build>
  <plugins>
    <plugin>
      <groupId>org.apache.maven.plugins</groupId>
      <artifactId>maven-compiler-plugin</artifactId>
      <version>3.8.0</version>
      <configuration>
        <source>8</source>
        <target>8</target>
        <encoding>UTF-8</encoding>
        <compilerArgs>
          <!-- Configure manifold plugin -->
          <arg>-Xplugin:Manifold</arg>
        </compilerArgs>
        <!-- Add the processor path for the plugin -->
        <annotationProcessorPaths>
          <path>
            <groupId>systems.manifold</groupId>
            <artifactId>manifold-json</artifactId>
            <version>${manifold.version}</version>
          </path>
          <path>
            <groupId>systems.manifold</groupId>
            <artifactId>manifold-strings</artifactId>
            <version>${manifold.version}</version>
          </path>
        </annotationProcessorPaths>
      </configuration>
    </plugin>

    <plugin>
      <groupId>org.apache.maven.plugins</groupId>
      <artifactId>maven-surefire-plugin</artifactId>
      <version>2.22.2</version>
    </plugin>
  </plugins>
</build>
If Lombok is already used in the project then use below configuration: <plugin>
<groupId>org.apache.maven.plugins</groupId>
<artifactId>maven-compiler-plugin</artifactId>
<version>3.8.0</version>
<configuration>
<source>8</source>
<target>8</target>
<encoding>UTF-8</encoding>
<compilerArgs>
<!-- Configure manifold plugin -->
<arg>-Xplugin:Manifold</arg>
</compilerArgs>
<!-- Add the processor path for the plugin -->
<annotationProcessorPaths>
<processorPath>
<groupId>org.projectlombok</groupId>
<artifactId>lombok</artifactId>
<version>1.18.24</version>
</processorPath>
<processorPath>
<groupId>systems.manifold</groupId>
<artifactId>manifold-json</artifactId>
<version>${manifold.version}</version>
</processorPath>
<processorPath>
<groupId>systems.manifold</groupId>
<artifactId>manifold-strings</artifactId>
<version>${manifold.version}</version>
</processorPath>
</annotationProcessorPaths>
</configuration>
</plugin>
Code:
Create a sample JSON file in src/main/resources folder.
The file should be created with package structure.
The file name should follow the class name.
E.g.
Create a folder named restapi in src/main/resources/
Create a file named User.json with below content:
{
  "firstName": "Sourav",
  "lastName": "Dalal"
}
A new class User.class will be created dynamically.The class file will be created under package restapi. You can create any package structure of your choiceYou can access the class like belowUser testUser = User.create();testUser.setFirstName("X");
testUser.setLastName("Y");
System.out.println(testUser.write().toJson()Happy Coding !! :)Further Reading:http://manifold.systems/articles/articles.htmlhttps://debugagent.com/revolutionize-json-parsing-in-java-with-manifold
Hi,
In this blog I will discuss 2 scenarios where RxJava threading can be helpful:
1. Run Multiple threads in parallel & wait for all of them to complete
2. Run threads sequentially (one after another)
First, add the below dependency in Maven
<dependency>
    <groupId>io.reactivex.rxjava2</groupId>
    <artifactId>rxjava</artifactId>
    <version>2.2.21</version>
</dependency>
Below are the 2 Completable threads created
import io.reactivex.Completable;
import io.reactivex.schedulers.Schedulers;
Completable cp1= Completable.fromAction(()->{
//business logic
}).subscribeOn(Schedulers.io());
Completable cp2= Completable.fromAction(()->{
//business logic
}).subscribeOn(Schedulers.io());Now for scenario 1cp1.mergeWith(cp2).blockingAwait(); // cp1 & cp2 will run concurrently & wait for complete for both tasksFor scenario 2cp1.andThen(cp2).subscribe(); //cp2 will run after cp1Further Reading:https://solidsoft.wordpress.com/2016/02/26/parallel-execution-of-blocking-tasks-with-rxjava-and-completable/
Many times you may need to check the password set-up in the Wifi Network. You can use the following steps:
Open Windows command prompt
type in below command replacing the wifi network name
netsh wlan show profile <wifi_nw_name> key=clear
In response check Key Content value under Security Settings
For Docker , if we want to persist any data after the container is removed we can use the following command format:
docker run -d -p 9090:8080 -v <OS File Path>:<Docker container Path> tomcat-test-webapp
Here the logs with be stored in OS file/folder path instead of storing in Docker container path
docker build -t tomcat-test-webapp .
docker run -d -p 9090:8080 -v F:/docker_data/logs:/usr/local/tomcat/logs tomcat-test-webapp
The -v option is used to create volume which persists in OS even after the container is removed.
With container name & Catalina Options it should look like below:
docker run -d --name testDockerWebApp -p 9090:8080 -v F:/docker_data/logs:/usr/local/tomcat/logs -e CATALINA_OPTS="-Xms512M -Xmx512M" tomcat-test-webapp
Format with log, connection pool, properties file externalization:
docker run -d --name <image_name> -p <external_port>:<Docker Internal Port> -v /opt/app_log/<app_name>:/usr/local/tomcat/logs -v /opt/app_cp/<app_name>:/usr/local/tomcat/conf/Catalina/localhost -v /opt/app_prop/<app_name>:/usr/local/properties/<app_name> -e CATALINA_OPTS="-Xms512M -Xmx512M" <docker_hub_image_name>
Pre-requisite: Docker Desktop for Windows to be installed & started
Steps:
Create a WAR file [e.g. TestApp.war]
Create a Dockerfile
Place both of them (WAR & Dockerfile) in same folder (e.g. D:\DevOps)
Navigate to that folder (D:\DevOps) & open command prompt
Run below command to create a image name. Here tomcat-test-webapp is the name of image
docker build -t tomcat-test-webapp .
To run the image use below command
docker run -d -p 8080:8080 tomcat-test-webapp
In case the port to be different use the below structure
docker run -d -p <custom port>:8080 tomcat-test-webapp
Content of Dockerfile
FROM tomcat:9.0.52-jdk8-corretto
COPY ./TestWebApp.war /usr/local/tomcat/webapps
EXPOSE 8080
CMD ["/usr/local/tomcat/bin/catalina.sh","run"]
https://www.youtube.com/watch?v=B9vy3DMHo2I
Pushing Image to Docker Hub
https://www.cloudbees.com/blog/using-docker-push-to-publish-images-to-dockerhub
Pulling Images from Docker Hub & Run
docker login
docker pull <docker_user_name>/tomcat-test-webapp:latest
docker run -d -p 9080:8080 <docker_user_name>/tomcat-test-webapp
In case to run image with memory settings or other Catalin options ; use below command:
docker run -d -p 9080:8080 -e CATALINA_OPTS="-Xms512M -Xmx512M" <docker_user_name>/tomcat-test-webapp
Auto Deploy the changes from Docker Hub:
WATCHTOWER_POLL_INTERVAL is set in sec.
docker run -d --name watchtower -e REPO_USER=<> -e REPO_PASS=<> -e WATCHTOWER_POLL_INTERVAL=30 -e WATCHTOWER_CLEANUP=true -v /var/run/docker.sock:/var/run/docker.sock containrrr/watchtower <container_name>
https://alexgallacher.com/auto-update-docker-containers-by-setting-up-watchtower/
https://containrrr.dev/watchtower/
https://www.geekyhacker.com/how-to-use-spotify-docker-maven-plugin/
1. Mockoon https://mockoon.com/
2. PlanetUML
3. Junit Auto test case generator (https://www.diffblue.com/community-edition/download/)
4. https://blog.jetbrains.com/idea/2024/07/top-tools-for-java-developers-in-2024/
5.https://www.thoughtworks.com/en-in/insights/blog
OpenSearch is a ElasticSearch fork from Amazon
Download Opensearch from https://opensearch.org/downloads.html
Extract opensearch-2.4.1-windows-x64.zip in a folder in Windows
Openserach comes with JDK 17
Set JAVA_HOME for JDK 17 in <OpenSearch Extracted Folder>/opensearch-2.4.1/bin/opensearch-env.bat
set JAVA_HOME=<OpenSearch Extracted Folder>/opensearch-2.4.1/jdk
Open <OpenSearch Extracted Folder>/opensearch-2.4.1/config opensearch.yml
Add the below line to disable secure connection
plugins.security.disabled: true
Now go to <OpenSearch Extracted Folder>/opensearch-2.4.1/opensearch-windows-install.bat
from command prompt.
Once started , navigate to http://localhost:9200/
Frontend:
Mockon for Mock API testing for frontend developer
Useful Links:
https://www.redhat.com/sysadmin/test-api-interactions-mockoon
https://nqaze.medium.com/the-api-dependency-conundrum-solved-6eb08e99a457
https://itnext.io/easy-front-end-development-with-mockoon-1ff656a7dba6
Backend:
For Backend API testing developers can use Karate Framework
Useful Links:
https://www.softwaretestinghelp.com/api-testing-with-karate-framework/
In this section we will try to execute a job at a certain interval, using Spring Reactor framework. The job should be defined in the subscribe method.
Maven Dependency:
<dependency>
<groupId>io.projectreactor</groupId>
<artifactId>reactor-core</artifactId>
<version>3.4.24</version>
</dependency>
Code Snippet:
Running a job at a certain interval (10 sec) forever.
Mono.just("SD").delaySubscription(Duration.ofSeconds(10)).repeat(()->true).subscribe(a->System.out.println(a));
Recently I have faced problem to install Kotlin Plugin for Eclipse IDE. As per the StackOverflow post the plugin has been removed. The nelwy forked linked that can be used to install Kotlin in Eclipse is
https://github.com/bvfalcon/kotlin-eclipse-2022
In this post, I will discuss how to use AWS Javascript SDK V3 for AWS Translate.
Prerequisite: Node.js should be pre-installed
Steps:
Below is the code snippet for translateExample.js
const { TranslateClient, TranslateTextCommand } = require("@aws-sdk/client-translate");
async function getTranslatedData(){
const client = new TranslateClient({ region: "<region_name>",
credentials: {
accessKeyId: '<access_key>',
secretAccessKey: '<secret_key>'
}
});
const params = {
SourceLanguageCode: "en",
TargetLanguageCode: "es",
Text: "Hello, world"
};
const command = new TranslateTextCommand(params);
const data = await client.send(command);
const jsonData =await data.TranslatedText;
console.log(jsonData);
}
getTranslatedData();
node translateExample
References:
https://docs.aws.amazon.com/AWSJavaScriptSDK/v3/latest/clients/client-translate/index.html
Here in this post I will discuss how to use AWS Translate Service from Java Code.
Steps:
1. Add the below dependency in pom.xml
<dependency>
<groupId>com.amazonaws</groupId>
<artifactId>aws-java-sdk-translate</artifactId>
<version>1.12.194</version>
</dependency>
2. Add below imports in Java File
import com.amazonaws.auth.AWSStaticCredentialsProvider;
import com.amazonaws.auth.BasicAWSCredentials;
import com.amazonaws.regions.Regions;
import com.amazonaws.services.translate.AmazonTranslate;
import com.amazonaws.services.translate.AmazonTranslateClient;
import com.amazonaws.services.translate.model.TranslateTextRequest;
import com.amazonaws.services.translate.model.TranslateTextResult;
Many of the times you need to use AWS services via Postman for testing.
I am using Amazon Translate Service, below are the configuration made to call the service:
In Postman choose the Post method for call
Service URL: https://translate.us-east-1.amazonaws.com/
In "Authorization" tab choose "Type" "AWS Signature"
Provide AccessKey, SecretKey, AWS Region, Service Name
The region I am using is "us-east-1" , Service Name will be "translate"
Then Move to "Headers" tab & add the following Headers
Content-Type: application/x-amz-json-1.1
X-Amz-Target: AWSShineFrontendService_20170701.TranslateText
N.B. X-Amz-Date will be generated by Postman automatically
Under "Body", select "raw", and added the following sample body:
Now hit the Send button & check the result.
Clicking on the "Code" in Postman you can also get the cod for Java/Node JS and many other languages.
Helpful Links:
https://stackoverflow.com/questions/59128739/how-to-use-aws-translate-translatetext-api-via-postman
https://docs.aws.amazon.com/translate/latest/dg/API_Reference.html
Many a times you might face to downlod maven dependency in Jenkins due to netwok issue. In that case, Maen repository needs to be configured in pom.xml.
Below is the snippet you can use to configure maven repo.
<project>
..................
<repositories>
<repository>
<id>central</id>
<name>Central Repository</name>
<url>https://repo.maven.apache.org/maven2</url>
<layout>default</layout>
<snapshots>
<enabled>false</enabled>
</snapshots>
</repository>
</repositories>
<pluginRepositories>
<pluginRepository>
<id>central</id>
<name>Central Repository</name>
<url>https://repo.maven.apache.org/maven2</url>
<layout>default</layout>
<snapshots>
<enabled>false</enabled>
</snapshots>
<releases>
<updatePolicy>never</updatePolicy>
</releases>
</pluginRepository>
</pluginRepositories>
</project>
Though today's date, microservice with Spring boot is a very popular architecture; but along with new architectural apps we need to maintain legacy apps also.
In legacy apps, we will often found external http calls. In my case, most of the times I found the legacy code is using Apache commons httpclient or plain java http calls.
One of the common mistake is, after making the call we often leave the http connection open instead of closing. This causes probelm when the called service is down & in those cases the calling apps will have memory issue.
To solve this, we can use Spring RestTemplate instead of other http clients. The main reason is, the code is tiny & crisp ; also the closing of connection is also handled by Spring.
Steps:
1. Add below maven dependency:
<dependency>
<groupId>org.springframework</groupId>
<artifactId>spring-web</artifactId>
<version>3.0.6.RELEASE</version>
</dependency>
2. Below is a sample code: Assumption is Code is sending JSON request & receiving JSON response
public static String callRestService(String serviceUrl, String strRQ) {
SimpleClientHttpRequestFactory clientHttpRequestFactory= new SimpleClientHttpRequestFactory();
//Connect timeout in milisec.
clientHttpRequestFactory.setConnectTimeout(1000);
//Read timeout in milisec
clientHttpRequestFactory.setReadTimeout(1000);
RestTemplate restTemplate = new RestTemplate(clientHttpRequestFactory);
HttpHeaders headers = new HttpHeaders();
headers.setAccept(Arrays.asList(MediaType.APPLICATION_JSON));
headers.setContentType(MediaType.APPLICATION_JSON);
HttpEntity<String> entity = new HttpEntity<String>(strRQ, headers);
ResponseEntity<String> response=restTemplate.exchange(serviceUrl, HttpMethod.POST, entity, String.class);
return response.getBody();
}
As a good software engineer, one needs to keep updated on the emerging technologies & the use cases where to apply those technologies.
To gain more knowledge, one should follow the technology blogs; below are few of my favorite technology blogs:
2. https://doordash.engineering/
3. https://engineering.cerner.com/
5. https://netflixtechblog.com/
6. https://medium.com/expedia-group-tech
7. https://comcast.github.io/blog.html
9. https://www.appsdeveloperblog.com/keycloak-rest-api-create-a-new-user/
Proxy server is one of the network backbone for any corporate network. There are 2 types of proxy setup
1. Forward Proxy: Used for the outbound traffic going from your network to Internet. It is also called Client Side Proxy.
2. Reverse Proxy: Used for inbound calls where traffic is coming from Internet to your network.
Below picture depicts the 2 proxies
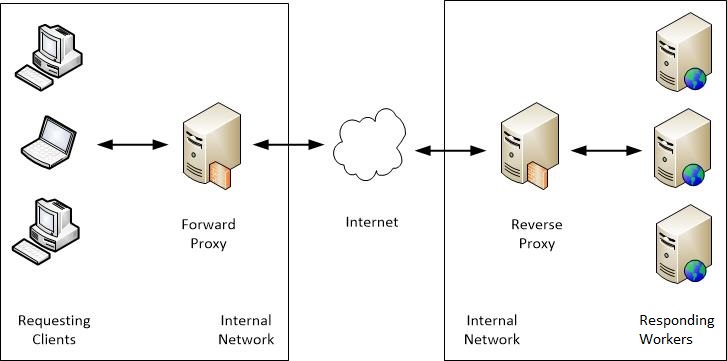
In this article, we will discuss on Forward Proxy setup & dicuss how to route the calls through Forward Proxy from Java Http client calling codes.
Step 1: Forward Proxy Setup in Windows
There are many open source Forward Proxy available like Apache Httpd , Squid etc.
I have chosen Squid for Proxy setup as it has a very easy setup.
First download Squid from https://squid.diladele.com/ & install the msi
This will be installed as a Windows service.
Step 2: Post Installation configuration of Squid
Once installed you will find Squid tray
Click "Open Squid Configuration" option
Add the below one at last of the configuration file, this will speed up the traffic calls.
dns_v4_first on
Step 3: Client calls from Java routing through Proxy
Suppose you want to call https://www.google.com/ from Java Client.
In this example, we will use Spring RestTemplate.
Create a new Maven project.
3.1. Add the below dependencies
<dependency>
<groupId>org.apache.httpcomponents</groupId>
<artifactId>httpcore</artifactId>
<version>4.4.13</version>
</dependency>
<!-- https://mvnrepository.com/artifact/org.springframework/spring-web -->
<dependency>
<groupId>org.springframework</groupId>
<artifactId>spring-web</artifactId>
<version>4.3.30.RELEASE</version>
</dependency>
3.2. Sample Code for Proxy call:
import java.net.InetSocketAddress;
import java.net.Proxy;
import java.net.Proxy.Type;
import org.springframework.http.ResponseEntity;
import org.springframework.http.client.SimpleClientHttpRequestFactory;
import org.springframework.web.client.RestTemplate;
public class ProxyHttpClient {
private static String PROXY_SERVER_HOST = "localhost";
private static int PROXY_SERVER_PORT = 3128;
public static void main(String[] args) {
Proxy proxy = new Proxy(Type.HTTP, new InetSocketAddress(PROXY_SERVER_HOST, PROXY_SERVER_PORT));
SimpleClientHttpRequestFactory requestFactory = new SimpleClientHttpRequestFactory();
requestFactory.setProxy(proxy);
RestTemplate restTemplate = new RestTemplate(requestFactory);
ResponseEntity<String> responseEntity = restTemplate.getForEntity("https://www.google.com/", String.class);
String bodyStr = responseEntity.getBody();
System.out.println("bodyStr:" + bodyStr);
}
}
Links:
Suppose you are working on a Order Management system. Once the order is placed, the system needs to do the following taks:
1. Send email notification to customer
2. Send request to Payment processing system to make payment.
Generally, in traditional way of programming, once the order is placed we call below 2 methods:
sendEmailToCustomer()
makePayment()
Now suppose , the product owner gives you a requirement to send email notification to seller also once the order is placed. To do that, now you need to introduce another method, sendEmailToSeller, along with the above 2 methods.
This approach has a drawback. If the order is created from multiple places, we need to introduce this change in all these places.
We can handle the same problem in event driven approch. We can consider Order creation as an event; hence it becomes a producer for event & sending email to cutomer , making payment & sending email to Seller become the event consumers.
Spring framework comes with an in-built support for Event Driven processing. It requires 3 elemts for an event:
1. the Event itself
2. Pulisher of the event
3. Consumer/Listener of the event
All of these are handled in Spring framework in an elegant way.
Prerequisite:
Java 8
Spring framework version: 4.3.30.RELEASE
Maven dependency:
<dependency>
<groupId>org.springframework</groupId>
<artifactId>spring-core</artifactId>
<version>4.3.30.RELEASE</version>
</dependency>
<dependency>
<groupId>org.springframework</groupId>
<artifactId>spring-context</artifactId>
<version>4.3.30.RELEASE</version>
</dependency>
Event: The event can be any Java Bean model class; for brevity have removed the getters & setters. You can add @Getter & @Setter annotation from lombok library also.
public class OrderEvent {
private String itemName;
private int quantity;
}
Event Publisher: Spring comes with an in built ApplicationEventPublisher class defined in org.springframework.context.ApplicationEventPublisher.
You can publish the event like below:
@Service
public class OrderEventProducer {
@Autowired
private ApplicationEventPublisher publisher;
public void publishTestEvent() {
OrderEvent order = new OrderEvent();
order.setItemName("Pen");
order.setQuantity(5);
System.out.println("Puslishing order");
publisher.publishEvent(order);
}
}
Caching is one of the important aspect when we do system design as it enhance the performance.
In many of my applications I have used Ehcache as a cache provider with Spring applications. One of the problem with Ehcache is ; the cache resides in Single Node.
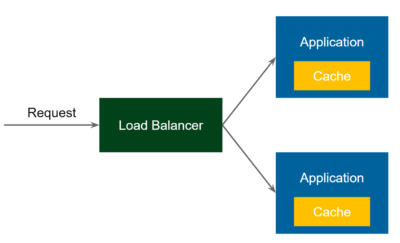
Let's consider the below scenario:
Suppoe, we have an application where we have a method which provides Book details based on isbn provided in input. The method to findBookByIsbn is costly & cache is implemented.
Now, we call findBookByIsbn for isbn 1 & through Load Balancer, it goes to Node 1 & it fetches the data from DataBase & store in cache.
Now, another call is made to findBookByIsbn for isbn 1 & through Load Balancer, it now goes to Node 2. In this case it again fetches the data from DataBase & store in cache.
Hence, for same data (isbn=1) the db call is again made in DataBase as the cache resides in each node seperately.
The architecture is deplicted in below image

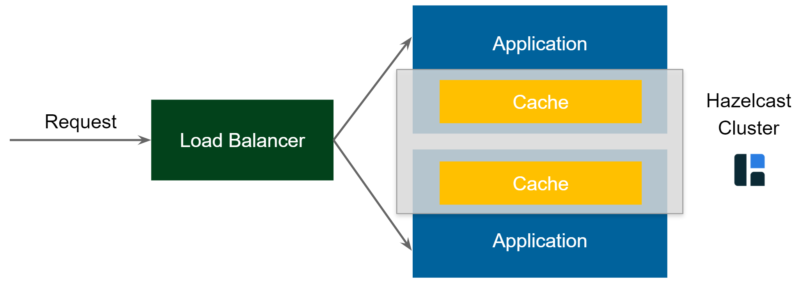
This technique can be implemented using Ehcache with JGroups.
As in Ehcache-Jgroups combination, we need to do lot of manual configuration, another good alternative is using Hazelcast. In this note, I am going to give you the steps you required to use HazelCast as cache manager
Pre-requisite:
Requied Java Version: 8
Spring Framework Verion used: 4.3.30.RELEASE
The Cache data type should implement Serializable interface
Step #1: Adding Maven dependency for Hazelcast Spring integration & Spring Context upport
<dependency>
<groupId>com.hazelcast</groupId>
<artifactId>hazelcast-spring</artifactId>
<version>4.2</version>
</dependency>
<dependency>
<groupId>org.springframework</groupId>
<artifactId>spring-context-support</artifactId>
<version>4.3.30.RELEASE</version>
</dependency>
Step #2: Defing the method. The method must be defined in a Spring Bean class (Class having annotation Service/Component or defined in XML)
@Cacheable("bookIsbnCache")
public Book findBookByIsbn(String isbn) {
// DB / Service call goes here
}
Step #3: Define the cache in application context xml
<beans xmlns="http://www.springframework.org/schema/beans"
xmlns:context="http://www.springframework.org/schema/context"
xmlns:p="http://www.springframework.org/schema/p"
xmlns:cache="http://www.springframework.org/schema/cache"
xmlns:hz="http://www.hazelcast.com/schema/spring"
xmlns:mvc="http://www.springframework.org/schema/mvc"
xmlns:xsi="http://www.w3.org/2001/XMLSchema-instance"
xsi:schemaLocation="
http://www.springframework.org/schema/beans
http://www.springframework.org/schema/beans/spring-beans.xsd
http://www.springframework.org/schema/context
http://www.springframework.org/schema/context/spring-context.xsd
http://www.springframework.org/schema/mvc
http://www.springframework.org/schema/mvc/spring-mvc.xsd
http://www.springframework.org/schema/cache http://www.springframework.org/schema/cache/spring-cache.xsd
http://www.hazelcast.com/schema/spring
http://www.hazelcast.com/schema/spring/hazelcast-spring.xsd">
<!-- Other bean definition-->
That' it. You can deploy your code in different ports in localhost & you will be able to see the cache is replicated among differnt nodes.
Below is the link for working demo:
https://github.com/souravdalal/SpringHazelcastCacheDemo
Furthur Reading:
Recently, I have migrated some of my applications from JDK 6 & 8 to JDK 11. As Oracle JDK 11 has a license cost associated with it; I have used Amazon Corretto JDK 11; which is a no-cost, multiplatform, production-ready distribution of OpenJDK.
Below are the steps followed for JDK 11 upgrade
Step 1: Install JDK 11 & Maven 3.6.3 & set the path
You can check the https://mkyong.com/java/how-to-set-java_home-on-windows-10/ for details of Java path settings
You can check the https://mkyong.com/maven/how-to-install-maven-in-windows/ for detail of Maven path settings
Step 2: Next ,you need to do couple of changes in your application pom.xml:
If you have Maven compiler version set for JDK 6 or 8 in any of the below format; then remove those
Format 1:
<properties>
<maven.compiler.target>1.8</maven.compiler.target>
<maven.compiler.source>1.8</maven.compiler.source>
</properties>
Format 2:
<plugins>
<plugin>
<artifactId>maven-compiler-plugin</artifactId>
<configuration>
<source>1.8</source>
<target>1.8</target>
</configuration>
</plugin>
</plugins>
We need to add the below compilation setting under <build> tag & surefire plugin settings should be modified as below:
<plugins>
<plugin>
<groupId>org.apache.maven.plugins</groupId>
<artifactId>maven-surefire-plugin</artifactId>
<version>2.22.0</version>
<configuration>
<argLine>
--illegal-access=permit
</argLine>
</configuration>
</plugin>
<plugin>
<groupId>org.apache.maven.plugins</groupId>
<artifactId>maven-compiler-plugin</artifactId>
<version>3.8.0</version>
<configuration>
<release>11</release>
</configuration>
</plugin>
</plugins>
Step 3: If your application is using Spring Framework 3.x or 4.x then you need to upgrade the Spring version to atleast 5.1.0.RELEASE.
As 5.1.0.RELEASE is the compatible version with JDK 11. Otherwise, you will not get compile time exception but at runtime you will get exception like below:
Caused by: org.springframework.beans.factory.BeanDefinitionStoreException: Failed to read candidate component class: file [MyClass.class]; nested exception is java.lang.ArrayIndexOutOfBoundsException: 11315
You can find more details in https://www.javagists.com/beandefinitionstoreexception-failed-to-read-candidate-component-class
Upgrading Spring version can give you comile time time error based on methods which has been removed from upper Spring version. E.g. Spring 3.x have methods in JDBCTemplate for queryForInt, queryForLong; which has been deprecated & queryForObject is introduced from Spring 4.x
Also, if you are using Spring JDK Timer (org.springframework.scheduling.timer); then it needs to be upgraded to Spring Quartz Scheduler.

